Testing Realm Migrations
One of the biggest draws of Realm is its robust automatic schema migration feature. Most frequent operations like adding or deleting object types and properties are done for you by the framework, all you need to do is just increment the schema number.
It is not magic, of course, and you will need to write manual migration code in cases where Realm can't do it for you automatically. Unless you are using Realm as a disposable cache, this is critical to get right, otherwise you are risking losing user data.
The logical step is to cover the migration code with unit tests, but how to go about it? This is how we'll do it:
- Using the app as usual, gather a sample database file
- Copy it to your project
- Add a test case where you perform a migration on this sample file to see if everything works
Let's walk through these steps one by one, but first we will need to organize Realm setup code so that it is easily accessible in unit tests.
Organize your Realm setup
One thing we absolutely need is access to Realm.Configuration as it is used in the app. The rest is mostly preference, but here's how I like to structure my Realm setup.
Most of the time, there is only one Realm database in the app and it is customary to configure it globally via the defaultConfiguration, so I define a case-less enum RealmConfigurator to use as a namespace and put setup code in static functions.
enum RealmConfigurator {
    static let schemaVersion: UInt64 = 7

    static func setup() {
        Realm.Configuration.defaultConfiguration = makeDefaultConfiguration()
    }

    static func makeDefaultConfiguration() -> Realm.Configuration {
        .init(
            schemaVersion: schemaVersion,
            migrationBlock: performMigration
        )
    }

    static func performMigration(migration: Migration, oldSchemaVersion: UInt64) {
        if oldSchemaVersion < 1  {
            migration.migrateToVersion1()
        }

        // Not each version needs a manual migration.
        // Here, we are pretending schema versions 2-5 were
        // automatic migrations and did not need any code.
        if oldSchemaVersion < 6 {
            migration.migrateToVersion6()
        }
    }
}
You should always keep in mind that your
migrationBlockis responsible for migrating all previous schema versions to the current one, all in one go.
The configuration should be set before you actually create any Realm instances, so a good place to call RealmConfigurator.setup() is early in your AppDelegate's application(_:didFinishLaunchingWithOptions:).
Now, the manual migration code itself can be written in an extension of Realm Migration type.
private extension Migration {
    // App v1.0.0 (schemaVersion 0) ← Don't forget to leave notes about which app versions will need this migration
    func migrateToVersion1() {
        // some code
    }
}

private extension Migration {
    // App v1.2.3 (schemaVersion 5) and below
    func migrateToVersion6() {
        // some code
    }
}
Writing manual migrations can be tricky and is a topic worth exploring by itself. If you need a place to start, check out the official sample code in the Realm repository.
Gather a sample DB
For this step we will need to make an actual .realm file that we can later copy to our project and use in unit tests.
This can be done in several ways. Writing some code to create and populate a file is an option, but in my opinion it is better to perform a clean install of your app on a device and play around for a bit. This way the sample will contain more realistic data, exactly how it will be on your users' devices, which will help you catch errors you might not have expected.
Remember that migration is performed just once to update from the old schema version to the most current one, so you will reuse this sample to test any future migrations from this particular schema number. Gather the data in such a way that all object types and properties are present, and as many as possible app states are represented.
Copy the sample to your project
Once you are done gathering sample data, locate and copy the realm file. If you are not sure where to look, it will probably be saved as default.realm in your app's Documents directory (on iOS).
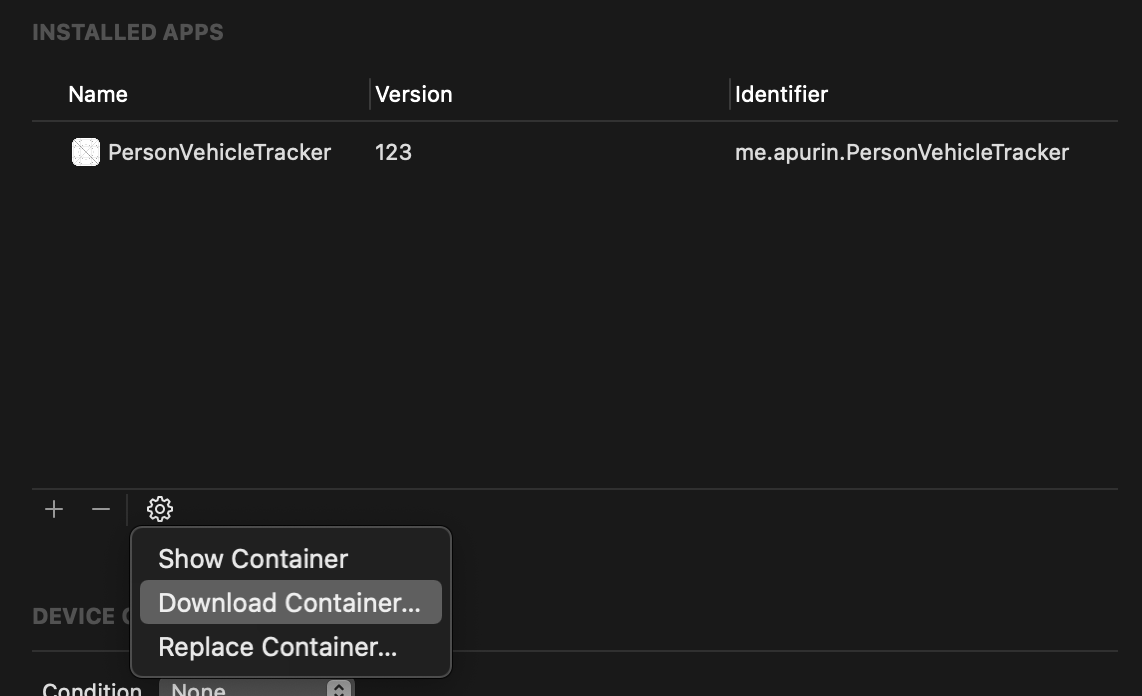
To copy from an iOS device:
- Open Devices and Simulators window (⇧⌘2)
- Select your device
- Select the app in the Installed Apps section
- Click the gear icon and select Download Container
- Right-click on the
xcappdatafile and select Show Package Contents - Go inside Documents folder
To copy from Simulator:
- Assuming you are using the setup from the section above, temporarily add a print statement to your code to show where the file is stored:
print(RealmConfigurator.makeDefaultConfiguration().fileURL) - Alternatively, it is easy to use a third-party Simulator companion app to quickly find your app sandbox folder. I like Sim Genie.
Before proceeding, you may need to prune some excessive data from the database file. Unit tests will make another copy and perform a migration each time they are run (which is often, hopefully), so a big file will lead to longer testing times. Use the official Realm Studio app to inspect and make changes to the file so that the data it contains is minimal while still being complete and representative.
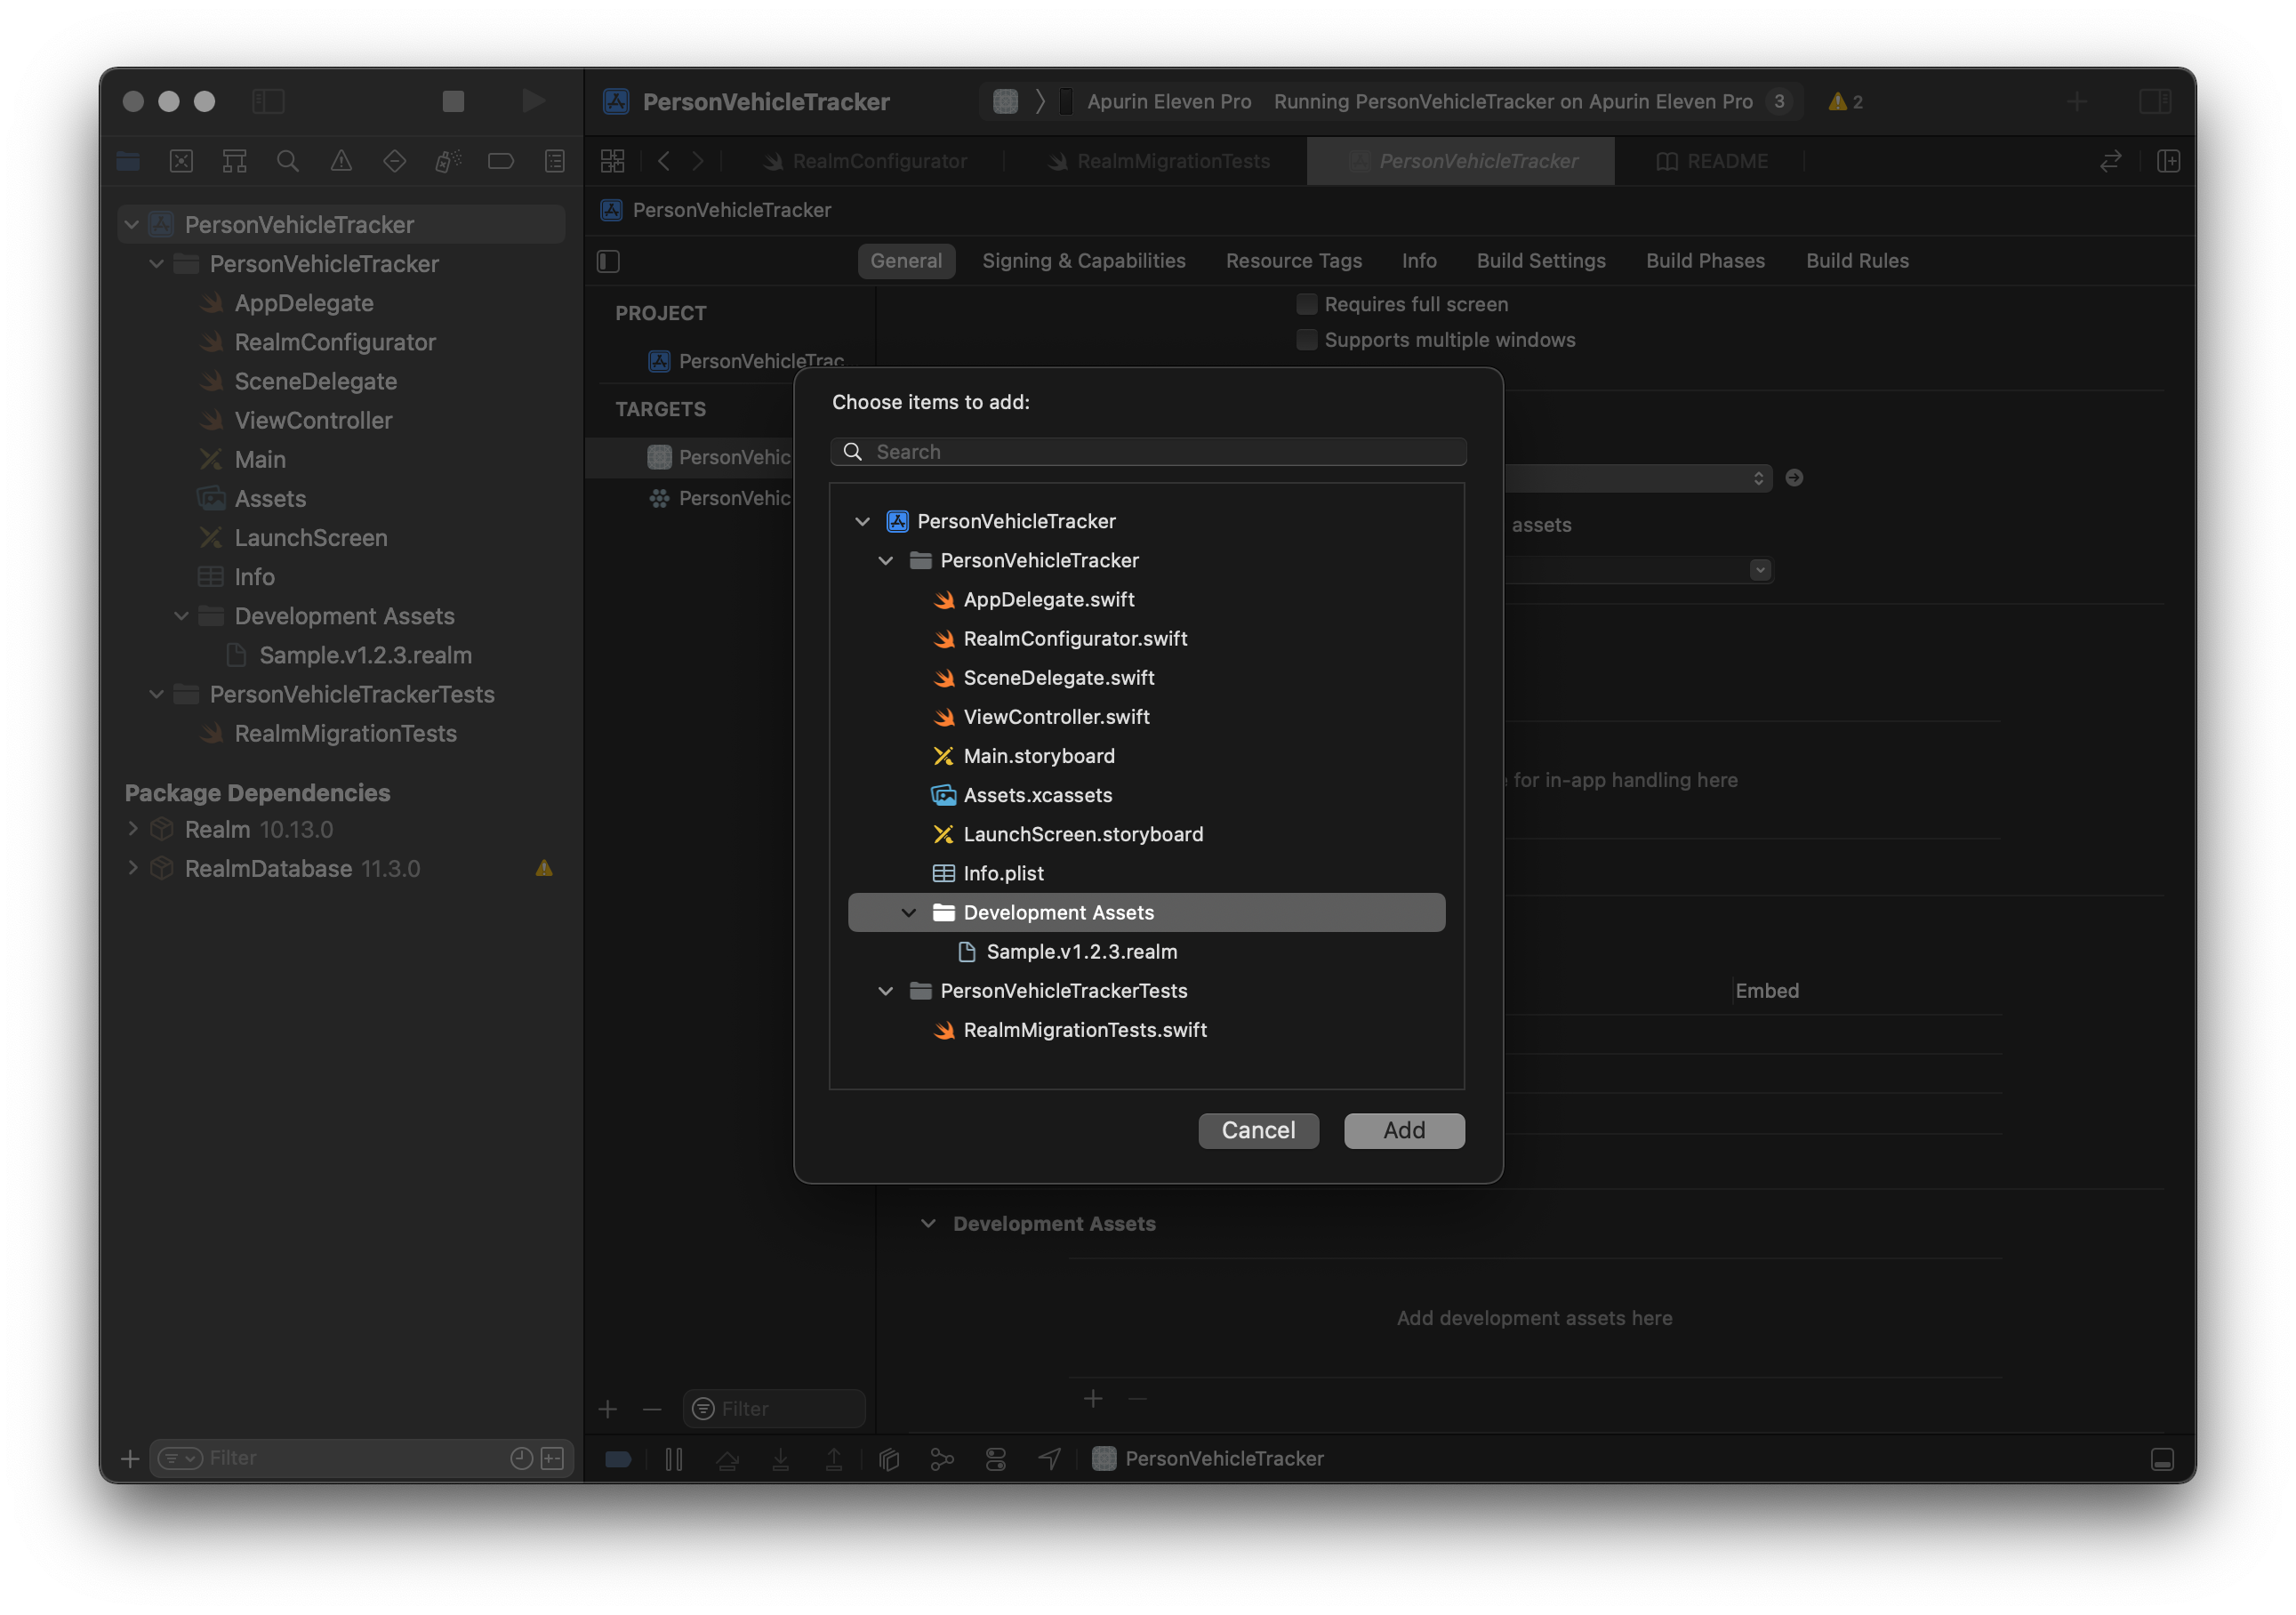
Finally, rename the file to something like Sample.v1.2.3.realm and drag it to your project. To prevent shipping it in the release build, let's create a folder for it named Development Assets and mark the folder as such in the target settings.
You can reuse this technique to create pre-populated database files with mock data for developing and testing your app.
Write unit tests
Let's create a new test case and start writing unit tests.
class RealmMigrationTests: XCTestCase {
    // Helpers and tests go here
}
First, we will define a couple of helper functions, starting with copy which will copy a file to the Documents directory inside the app sandbox, overwriting it if needed.
private func copy(
    _ fileURL: URL,
    file: StaticString = #file,
    line: UInt = #line
) throws -> URL {
    let manager = FileManager.default
    let documents = try XCTUnwrap(
        manager.urls(for: .documentDirectory, in: .userDomainMask).first,
        file: file,
        line: line
    )
    let destination = documents.appendingPathComponent(fileURL.lastPathComponent)
    if manager.fileExists(atPath: destination.path) {
        try manager.removeItem(at: destination)
    }
    try manager.copyItem(at: fileURL, to: destination)
    return destination
}
Next, we are adding a migrateRealm helper to create a Realm instance from the sample DB file we have added to our project.
private func migrateRealm(
    fileURL: URL,
    fromSchemaVersion: UInt64,
    file: StaticString = #file,
    line: UInt = #line
) throws -> Realm {
    let copiedFile = try copy(fileURL, file: file, line: line)

    XCTAssertEqual(try schemaVersionAtURL(copiedFile), fromSchemaVersion, file: file, line: line)

    var configuration = RealmConfigurator.makeDefaultConfiguration()
    configuration.fileURL = copiedFile
    let realm = try Realm(configuration: configuration)

    XCTAssertEqual(try schemaVersionAtURL(copiedFile), RealmConfigurator.schemaVersion, file: file, line: line)

    return realm
}
Notice we are using schemaVersionAtURL to check the schema version before and after instantiating Realm. Just by calling this function we can make sure that our migration code was performed without any critical errors.
Now all that is left is writing a unit test for the sample file we have gathered.
Let's pretend we had object of type Person that held a list of Cars, but with the new vesion of our app we have decided that just saving cars is too narrow so we remade Car object into a Vehicle. This is how you could write a unit test to check if everything went correctly.
/// Test migration from app v1.2.3 (schemaVersion 5)
func testMigrationFromVersion5() throws {
    let sampleResource = try XCTUnwrap(
        Bundle.main.url(forResource: "Sample.v1.2.3", withExtension: "realm")
    )
    let realm = try migrateRealm(fileURL: sampleResource, fromSchemaVersion: 5)
    // If we reach here it already means that the file was migrated without any fatal errors

    // Checking all Person objects in the sample survived the migration (we had 12)
    XCTAssertEqual(realm.objects(Person.self).count, 12)
    // Checking that all Persons with cars now have Vehicles (we had 5)
    XCTAssertEqual(realm.objects(Person.self).filter({ !$0.vehicles.isEmpty }).count, 5)

    // Plucking an object with a certain id to check that all properties were migrated
    let samplePerson = try XCTUnwrap(realm.object(ofType: Person.self, forPrimaryKey: "C395D5F4-21EC-44F9-8437-55CE0DFA9562"))
    let sampleVehicle = try XCTUnwrap(samplePerson.vehicles.first)
    XCTAssertEqual(vehicle.make, "Apple")
}
Renaming objects means writing a ton of stringly typed manual migration code, so avoid it if you can. If you are not against leaving the old name reference, you can define a typealias instead of completely renaming an object:
typealias NewAndFancyObject = OldAndTiredObject.
That's all there is to it. Now we have a sample file to see what the app database looked like at a certain version, and a unit test to check whether we can upgrade it to the current schema.